
Erasing your iPhone can come in handy in different situations. Perhaps you’re looking to sell your device, give it to another relative, or fix certain errors. Using the inbuilt Erase All Content and Settings feature in Settings is an convenient way. However, if you’re experiencing problems with the verification process, chances are you’ll be unable to complete the erase process.
In today’s post, we’ve discussed the possible reasons you might experience failed verification during iPhone erasure and the solutions to fix the problem quickly. Keep reading to find out more.
Part 1: Reasons and Fixes for Erase iPhone Verification Failed
If you’re receiving the “Verification Failed” message when erasing iPhone in Settings, there are several reasons you might experience this problem. In this part, we’ll show you the possible causes of the problem and the best fixes.
Reason 1: Apple Server Downtime
Apple server is responsible for handling various services, including iCloud authentication and device erasure verification. Suppose Apple’s server is down, either for scheduled maintenance or unexpected outages. In that case, your iPhone will be unable to communicate with Apple’s server to verify your credentials, leading to a verification failure.
Fix 1: Check Apple ID System Status
A quick way to confirm whether there is a problem with Apple server is to check the Apple ID system status. You can use the following steps to learn how to do this.
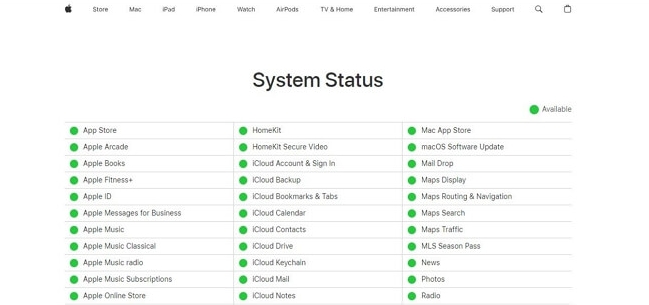
Step 1: Open the Apple System Status website in your browser.
Step 2: You should see various Apple system statuses, just as it’s shown in the screenshot below. If the “icon” next to “Apple ID” is showing “green” then, it is available. Otherwise, there is a problem and it’s suggested to erase your iPhone when the Apple ID service work normally.
Reason 2: iOS Glitches
Glitches in the iOS operating system are another reason verification might fail when you’re trying to erase your iPhone. These glitches may stem from software bugs, incomplete or corrupted updates, or conflicts within the system.
Fix 2: Force Restart iPhone/ Update iOS
One of the ways you can resolve iOS glitches is to restart your iPhone or update its iOS to the latest version.
Follow the steps below to see how this works:
Option 1: Restart iPhone
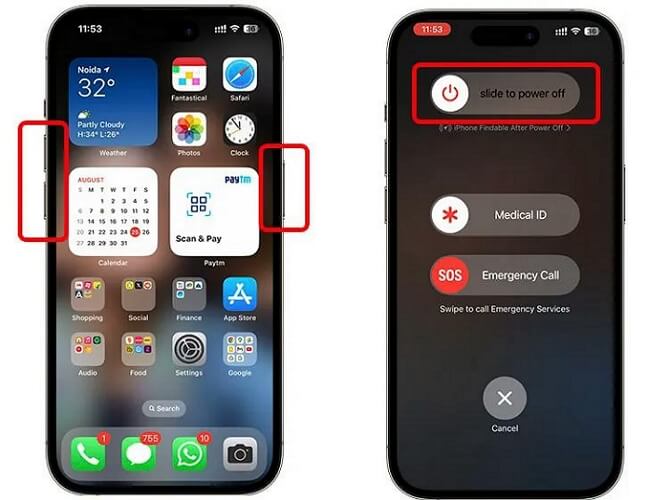
Step 1: Access the Power Off Slider.
If you use iPhone X or later, press the Volume Up and Side buttons until the power off slider appears.
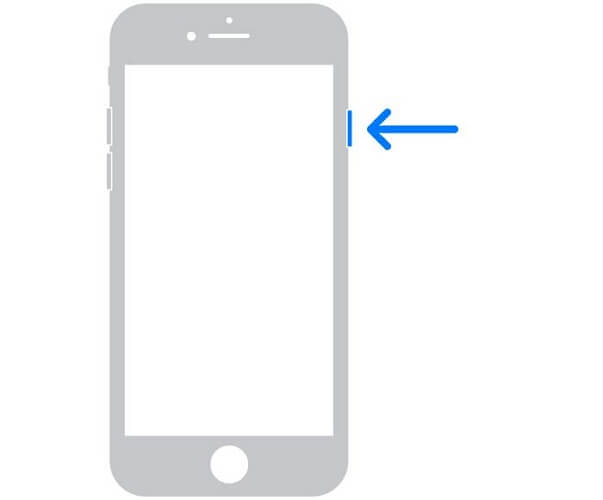
On iPhone 6, 7, 8, or SE (2nd & 3rd Gen), hold down the “Side button” and don’t release it unless you see the “power off” option.
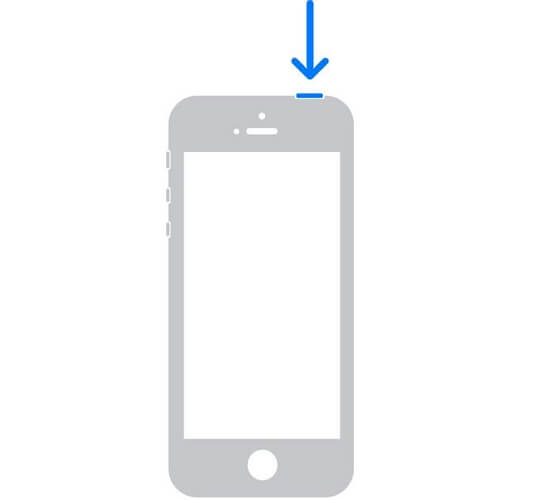
For iPhone SE (1st Gen), 5, or earlier, hold only the “top button”, and release it when the power off slider shows.
Step 2: Drag the “power off” slider to the right to turn off the iPhone.
Step 3: After your iPhone completely turns off, turn it back “ON”.
Option 2: Update iOS
Step 1: Open “Settings” and select “General”.
Step 2: Select “Software Update” and your iPhone will automatically check if there is any update available.
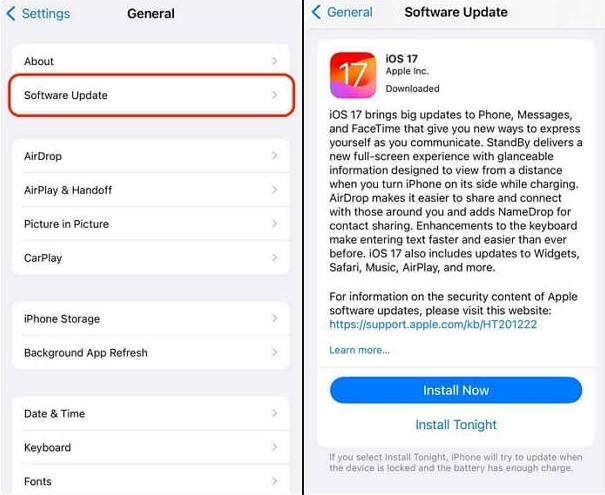
Step 3: Follow the on-screen instructions to download and install the update.
Reason 3: Unworkable/Unstable Network Connection
A stable network connection is essential for your iPhone to communicate with Apple’s server during the verification process. If your network connection is unstable, weak, or not functioning correctly, it can disrupt this communication. This disruption can prevent the device from verifying your request to erase the iPhone, resulting in a verification failure.
Fix 3: Check the Network Connection/Reset Your Network Settings
We recommend checking your internet connection first and resetting your network settings (if necessary) if you have an internet connection problem.
Option 1: Turn on WiFi/Cellular if they are on. Besides, if you’re using cellular data, switch to a stable WiFi connection or vice versa.
Option 2: Follow these steps to reset your iPhone network settings.
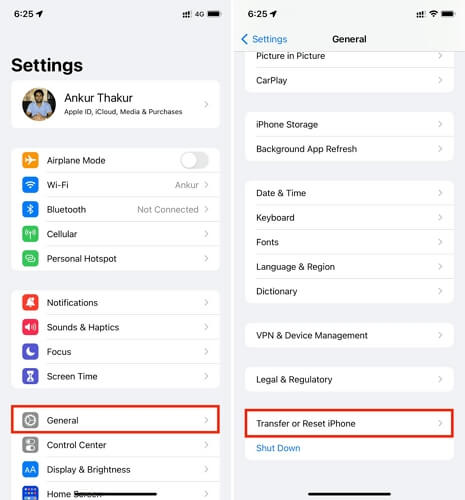
Step 1: Go to the “Settings” app and choose “General”.
Step 2: Scroll to the bottom of the page and choose “Transfer or Reset iPhone”.
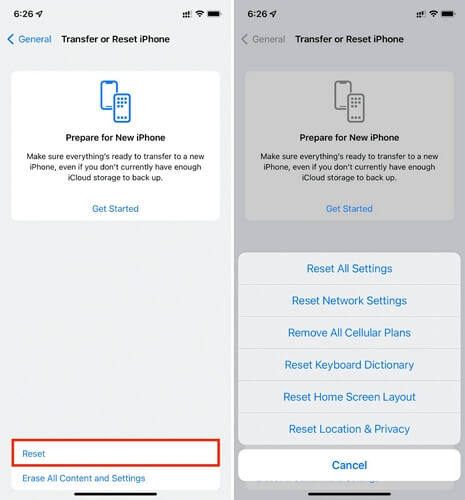
Step 3: Tap on “Reset” and then Choose “Reset Network Settings” and enter your iPhone password. Then, tap on “Reset Settings”.
Reason 4: Incorrect Data and Time
Apple server communications often rely on time-stamped certificates to establish secure connections. So, if the date and time on your iPhone are incorrect, it can lead to mismatches and errors during the verification process.
Fix 4: Adjust Date and Time
To adjust your iPhone date and time, we advise you to set them to update automatically by using the following procedure.
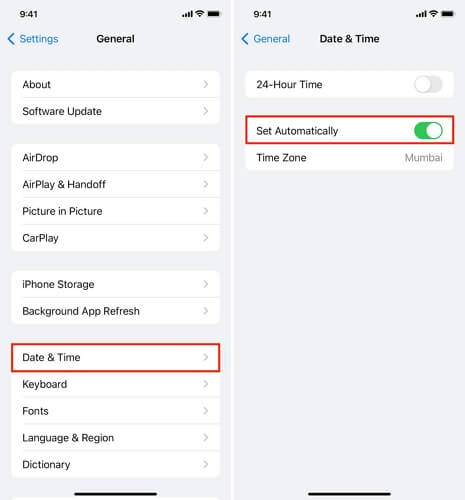
Step 1: Launch the “Settings” app and choose “General” > “Date & Time”.
Step 2: Toggle on the option that says “Set Automatically”.
Reason 5: Enabled Screen Time
If Screen Time restrictions are enabled, they can interfere with the ability to reset inside the iPhone. This is because certain restrictions might prevent changes to the device’s settings or require additional authentication to proceed with the erasure.
Fix 5: Turn off Screen Time
Here is how you can turn off Screen Time on any iPhone model:
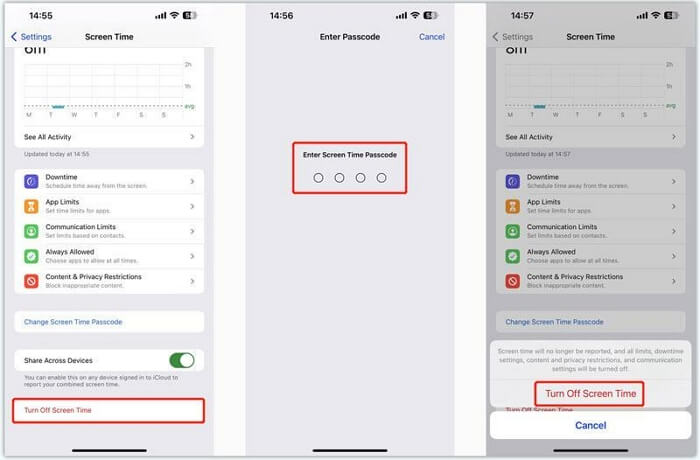
Step 1: Launch the “Settings” app.
Step 2: Choose “Screen Time” and tap on “Turn Off Screen Time”.
Step 3: Provide the relevant passcode to turn off Screen Time.
Part 2: Alternative Ways to Erase iPhone Outside the Settings App
If none of the above methods resolve the verification error, there are several alternative techniques that you can use to erase your iPhone without using the Settings app.
Note: If Find My feature is enabled on your iPhone, iCloud Activation Lock will appear after erasing iPhone and you need the corresponding Apple ID and password to remove the iCloud Lock.
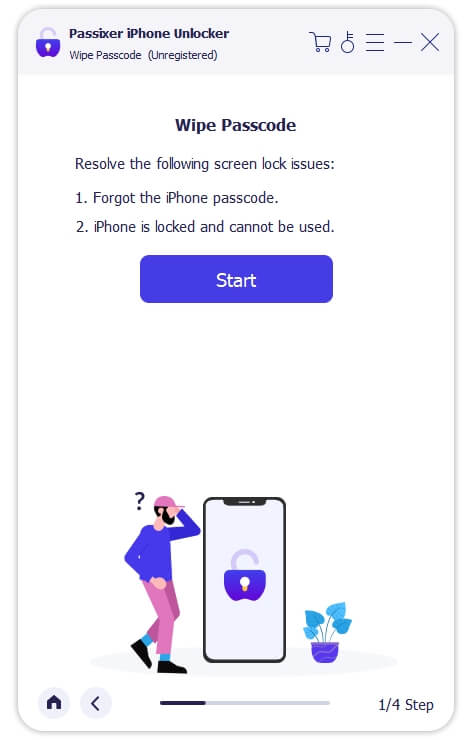
Way 1. Erase iPhone with Passixer
An easy way to erase your iPhone without requiring verification is by using Passixer iPhone Unlocker. This is professional iPhone unlocking software with many interesting useful features, including a “Wipe Passcode” feature that allows you to unlock iPhone and erase its data and settings without requiring any technical knowledge.
Also, it’s worth mentioning that Passixer is not limited to just unlocking and erasing iPhone without verification. It can also remove other types of iPhone locks like MDM lock, iCloud Activation Lock and Screen Time Restrictions.
Key Features
- Super fast iPhone screen unlock (within a few minutes), and works with all iPhone models and iOS versions.
- Efficiently handles different types of iPhone screen locks including 4/6-digit passcode, Face/Touch ID, custom alphanumeric/numeric code.
- Its sleek user interface and well-detailed guide make navigation easy for users with any experience level.
- Ensures no data is leaked during and after the unlock operations.
Steps to Erase and Unlock iPhone Using Passixer
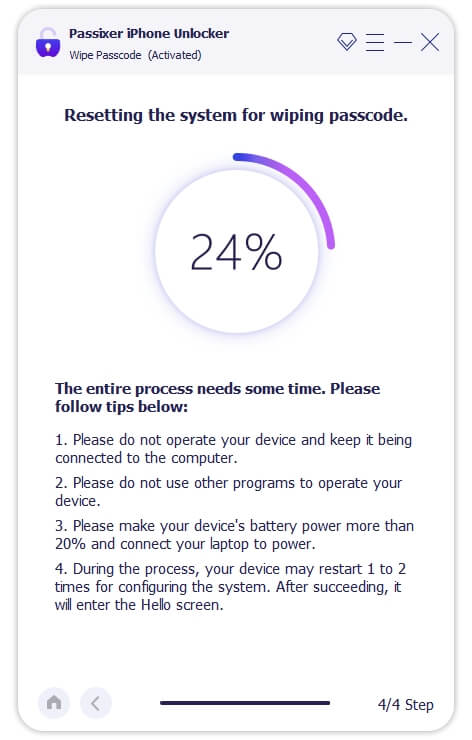
Step 1: Start Passixer iPhone Unlocker on your computer. Choose “Wipe Passcode” and click “Start”.
Step 2: Connect your iPhone to the computer. Then, wait for Passixer to display your iPhone information and click “Start” to confirm the details.
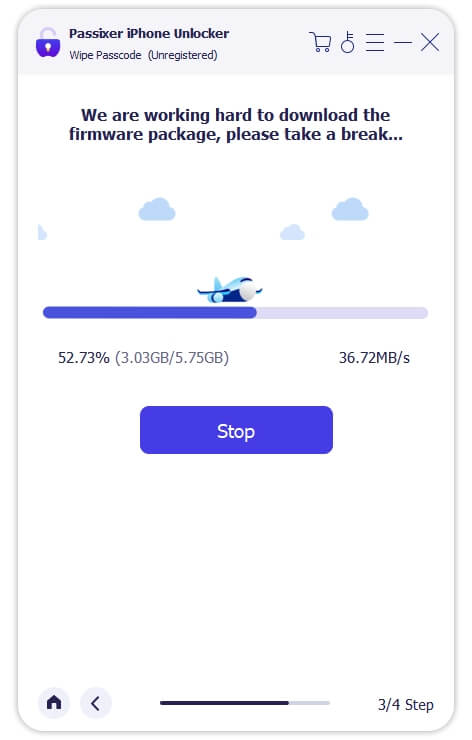
Once you click the button, Passixer will automatically start downloading the “Firmware” required for the unlock.
Step 3: Click on “Next” after the download is complete and type the “0000” code into the “box”.
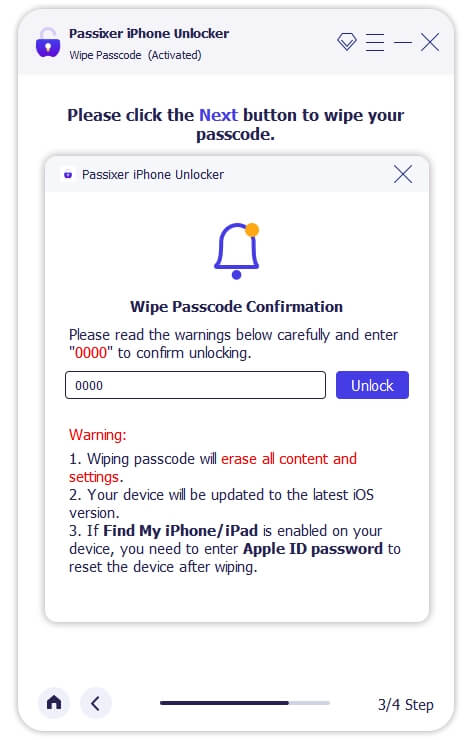
Click on the “Unlock” button to unlock and erase your iPhone immediately.
Way 2. Erase iPhone via iCloud
If Find My is enabled on your iPhone and you can still remember your iPhone’s Apple ID and password, you can easily use the iCloud website to erase your iPhone. This a very simple technique, and you don’t need any third-party tool for the operation.
Step 1: Open “iCloud.com” and sign in to your iCloud account using your Apple ID and password. Then, select “Find My”.
Step 2: Click on “All Devices”, and choose the iPhone you wish to erase from the list of devices.
Step 3: Click on “Erase This Device”.

Way 3. Erase iPhone Using iTunes
The iTunes app is also a reliable alternative to erase iPhone when you can’t reset the device in inbuilt Settings. All you just need is to boot your iPhone into recovery mode and use iTunes to restore it to factory settings. See the steps below to learn how this works:
Step 1: Boot your iPhone into recovery mode by doing the following:
- For iPhone 8 or Later: Quickly press and release the “Volume Up” button, then do the same for the “Volume Down” button. Next, hold the “Side” button until your iPhone enters “recovery mode”.
- For iPhone 7 and 7 Plus: Hold the “Volume Down” and “Side” buttons simultaneously until the recovery mode screen shows up.
- For iPhone 6s and earlier: Press the “Home Button” and “Side/Top” buttons and release them when you see recovery mode screen.

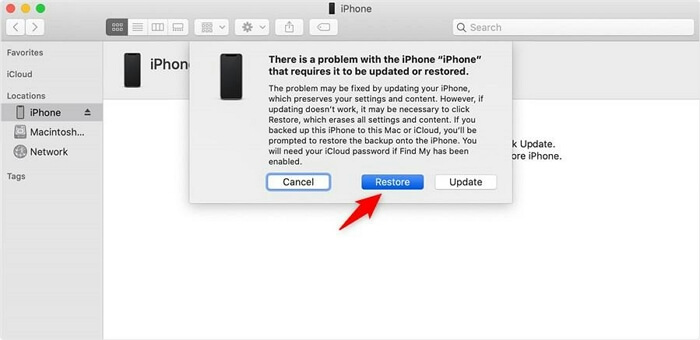
Step 2: Connect your iPhone to the computer and launch iTunes.
Step 3: Click on “Restore” from the pop-up message and follow the on-screen instructions to erase your iPhone.
Way 4. Erase iPhone from Lock Screen (iOS 15.2 or Later)
In iOS 15.2, Apple introduced the “Erase iPhone” feature that allows users to set their iPhone to factory settings when they can’t remember their passcode on the iPhone itself. So, if you’re struggling with failed verification when trying to erase your iPhone with the Erase All Content and Settings option, you can easily follow the steps below to erase it from the lock screen.
Step 1: Enter the wrong passcode until you see the “iPhone Unavailable” screen. Then, select “Erase iPhone”.
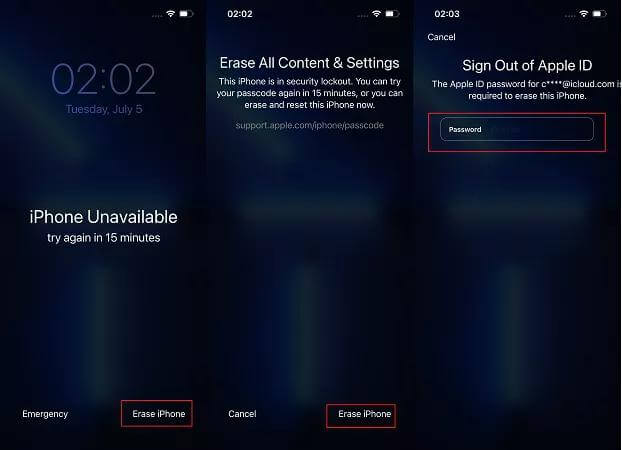
Step 2: Select “Erase iPhone” again. This is to confirm that you do not mind “Erasing all content and settings” on your iPhone.
Step 3: Once you’re asked to provide your Apple ID password, enter the correct details to reset your iPhone.
FAQs
Why won’t my iPhone let me erase all content and settings?
There are different reasons your iPhone might not allow you to erase all content and settings. It could either be a result of poor internet connection, wrong verification passcode, bugs and glitches, Apple ID server error, or erase iPhone verification failure.
Conclusion
Encountering a verification failure when attempting to erase an iPhone on the iPhone itself can be frustrating but the good news is, it is fixable. This article has outlined several effective solutions to deal with the issue, from restarting your iPhone to updating iOS, resetting network settings, etc. For those seeking alternatives, third-party software like Passixer iPhone Unlocker is a reliable option.