Updated on 2025-03-28
5min read
As time passes, Android devices can become slow or encounter software glitches that affect performance. Whether you’re fixing ongoing issues, preparing to sell your phone, or simply wanting a fresh start, a factory reset can help. This process will restore your device to its original settings, wiping all data, apps, and personal configurations to give it a clean slate.
In this guide, we’ll walk you through how to factory reset your Android device, step by step, even if you’re unable to access it.
Part 1. Why do you need a factory reset?
1. Fixing Performance Issues: Over time, devices may slow down or crash due to accumulated data or software conflicts. A factory reset offers a fresh start.
2. Removing Malware: Deeply integrated malware can be tough to remove with antivirus tools. A factory reset wipes everything, eliminating threats.
3. Preparing for Sale: Before selling or donating a device, a factory reset ensures all personal data is erased, protecting your privacy.
4. Fixing Software Errors: Persistent software problems can be resolved by restoring the device to its original settings.
What happens when you factory reset?
A factory reset restores an Android device to its original state by deleting all user data, apps, and settings. It’s often used to fix performance issues or prepare the device for a new user. However, it may not erase data from external storage (like SD cards), and some pre-installed apps or firmware updates may remain.
Part 2. Things to Do Before Factory Reset Android
Before executing a factory reset on your Android device, it is crucial to follow specific procedures to safeguard your data and avoid possible problems.
1. Backup Your Phone’s Data
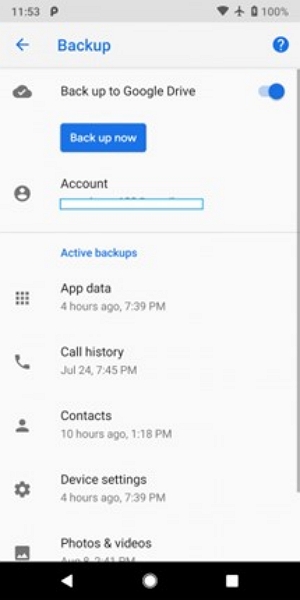
Google Drive: Confirm that your contacts, calendar appointments, application data, and images are saved to your Google Account. Go to Settings > System > Backup, and check that “Back up now” is turned on.
Local Storage: Link your device to a computer and manually move essential files, like documents, music, and videos, to the storage on your computer.
2. Remove Google Account (to avoid FRP lock issues)
Factory Reset Protection (FRP) is a security measure on Android devices designed to block unauthorized access following a reset. To prevent facing FRP lock –
Step 1: Go to Settings > Passwords & accounts.
If this option isn’t available, try one of the following, depending on your device: Users & accounts; Passwords, passkeys & autofill; Password, passkeys & accounts; Manage accounts
Step 2: Choose every Google Account associated with your device.
Step 3: Click “Remove Account” for every account.
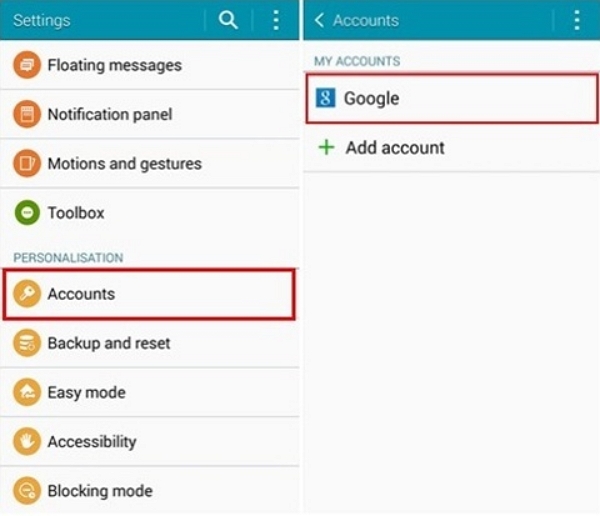
If this is the only Google account on your device, you’ll need to enter your device’s pattern, PIN, or password for security.
3. Charge Your Device
To avoid your device powering off during the reset procedure –
Step 1: Link your device to its charger.
Step 2: Make sure the battery is charged to a minimum of 50%.
This measure assists in preventing possible issues during the reset.
Part 3. How to Factory Reset Android Phone & Android Tablet (For working devices)
Performing a factory reset on your Android device returns it to its initial settings, removing all personal information and apps. This procedure helps resolve ongoing problems or get the device ready for sale.
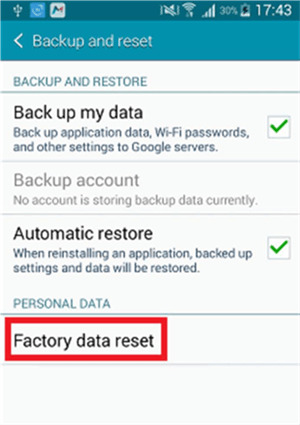
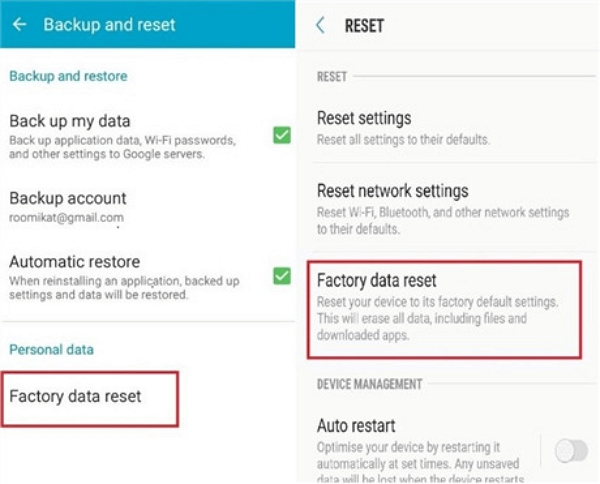
For Samsung Mobile Devices:
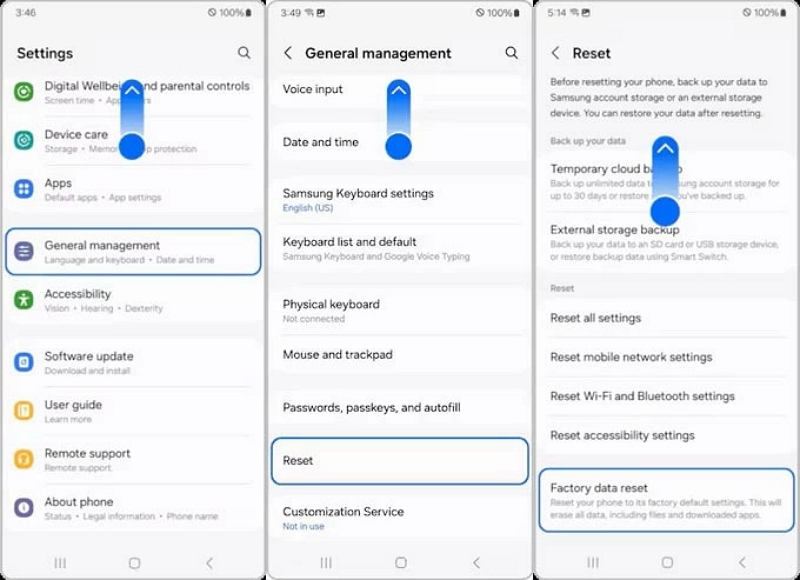
Step 1: Launch the Settings application. Scroll down and select General Management.
Step 2: Choose Reset, then press Factory Data Reset.
Step 3: Press Reset and input your unlock PIN, password, or pattern.
Step 4: Lastly, click Delete All to validate and start the reset process.
For Motorola Mobile Devices:
Step 1: Launch the Settings application. Go to System and select Backup and reset Options.
Step 2: Choose Factory Data Reset.
Step 3: Verify your choice to initiate the reset procedure.
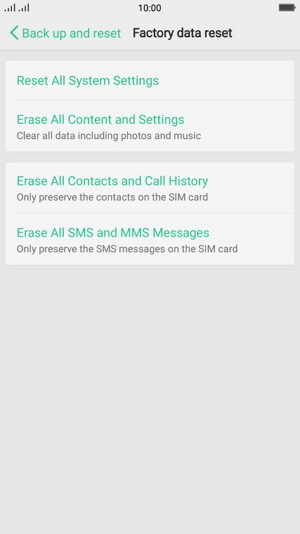
For OPPO Mobile Devices:
Step 1: Navigate to Settings and then select System Settings.
Step 2: Navigate to Backup and Reset, then choose Factory Data Reset.
Step 3: Press Erase All Content and Settings to verify and initiate the reset.
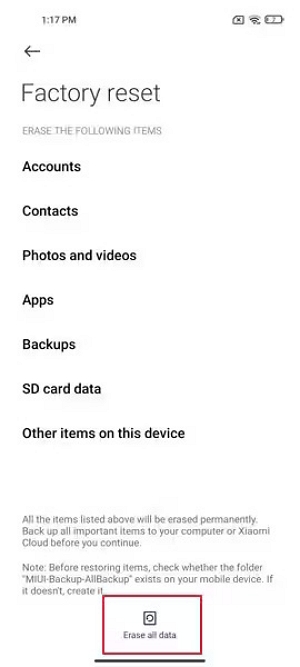
For Xiaomi Mobile Devices:
Step 1: Access Settings and scroll down to locate the Factory Reset choice.
Step 2: Click on Erase all information at the bottom.
Step 3: You will need to input the passcode for your phone. After entering, you have the option to either back up your data or continue with the reset.
Step 4: After waiting roughly 10 seconds, press OK, and the phone will initiate the reset process.
For Google Pixel Mobile Devices:
Step 1: Launch the Settings application.
Step 2: Scroll down to System and select Reset Options.
Step 3: Choose Erase All Data (Factory Reset).
Step 4: Press the Reset Phone to verify and continue with the reset.
![]()
For VIVO Mobile Devices:
Step 1: Access the Settings app on your phone.
Step 2: Press on System and then choose Reset Options.
Step 3: Select Erase All Data (Factory Reset).
Step 4: Tap Reset Phone to confirm and begin the factory reset.
For Huawei Mobile Devices:
Step 1: Launch the Settings application.
Step 2: Press on System & Updates and then choose Backup and reset.
Step 3: Select Factory Data Reset.
Step 4: Press Reset > Factory data reset to confirm and initiate the reset procedure.
For Android Tablets:
Step 1: Launch the Settings application.
Step 2: Select System or Backup & Reset.
Step 3: Choose Factory Data Reset or Clear All Data.
Step 4: Verify by selecting Reset Tablet and adhere to the on-screen prompts.
Part 4. How to Factory Reset Android Phone Without Password (Best Solutions)
Forgetting the screen lock on your Android phone can be annoying, but there are various methods to reset your device and recover access. If you can’t remember your PIN, password, or pattern, we’ll guide you through the most effective ways to factory reset your Android phone without needing a password.
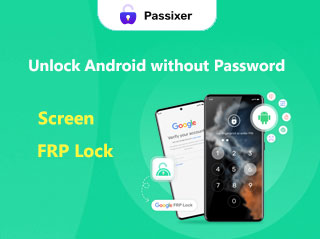
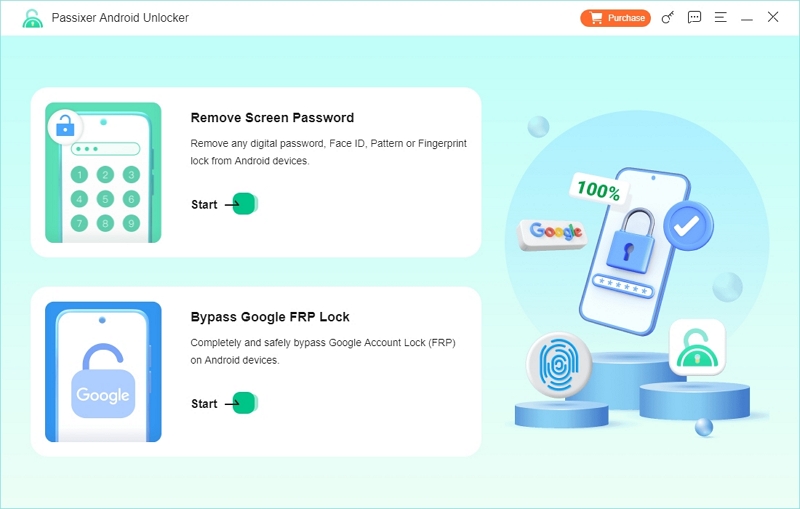
Method 1: The Easiest Way – Use Passixer Android Unlocker
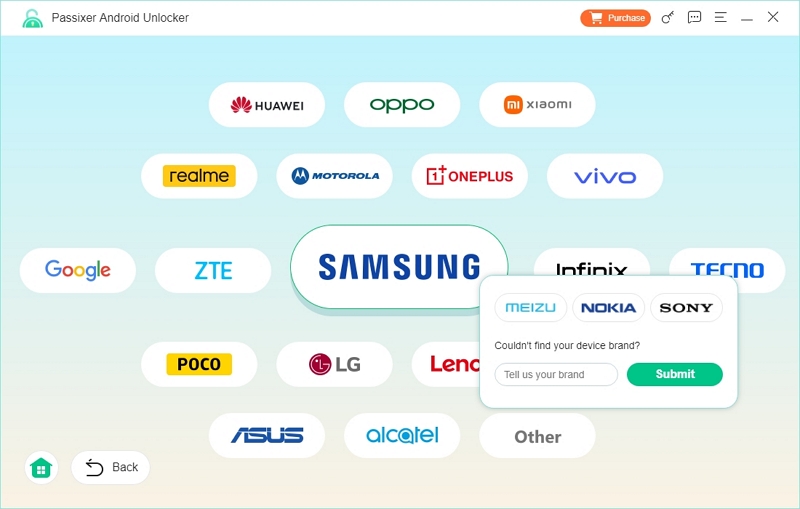
Passixer Android Unlocker is a robust and user-friendly program aimed at assisting users in unlocking their Android devices in multiple scenarios. Whether you’ve overlooked your screen lock, are facing an FRP (Factory Reset Protection) lock, or require bypassing a Google account, Passixer guarantees a seamless and easy unlocking experience. It is compatible with all Android versions, such as Android 15, and functions with various device models, including older Samsung devices. Passixer simplifies unlocking your Android phone more than ever, boasting a high success rate with no data loss for compatible devices.
Key features:
- Remove All Screen Locks: Eliminates PIN, pattern, password, fingerprint, and facial recognition locks.
- Data Preservation: Enables older Samsung devices to be unlocked while retaining all data.
- Extensive Compatibility: Works with Android 6.0 and higher, encompassing Android 15.
- User-Friendly: Straightforward 3-step procedure to access your Android device.
- No Technical Skills Needed: Intuitive interface designed for all, no technology know-how required.
Factory reset an Android phone without a password –
Step 1: Start by downloading the complete edition of Passixer Android Unlocker onto your computer. After installation, launch the software.
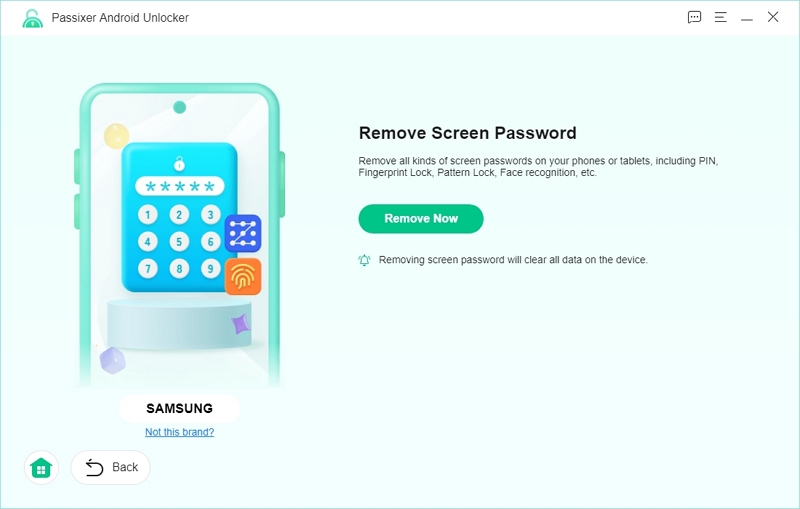
Step 2: In the primary interface of the application, select the option to “Bypass Google FRP Lock”.
Step 3: Choose the appropriate brand of your Android device from the list of compatible phones to guarantee compatibility.
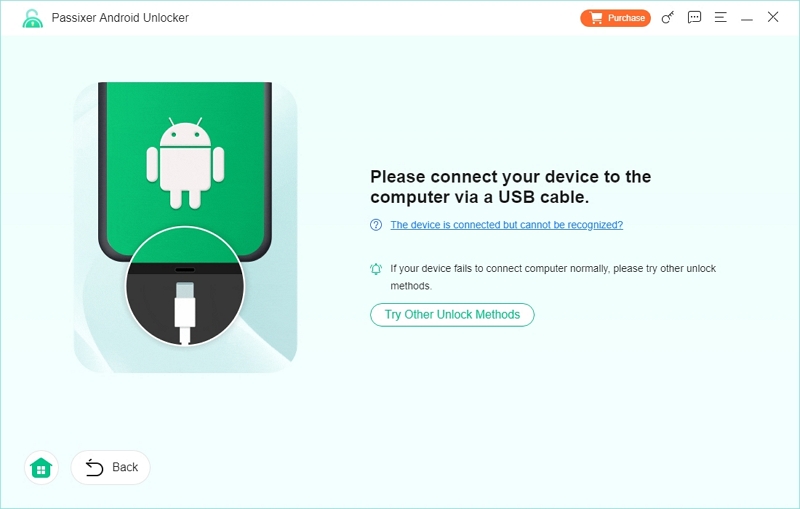
Step 4: Connect your Android phone to the computer using an official USB cable. Make sure the link is reliable.
Step 5: After the phone is connected, press the “Remove Now” button to continue with the unlocking procedure.
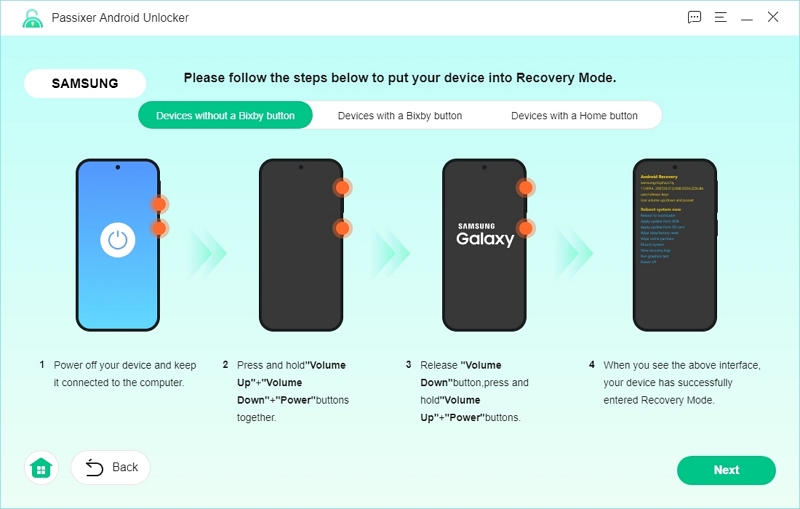
Step 6: Adhere to the on-screen prompts on Passixer to set your device into Recovery Mode.
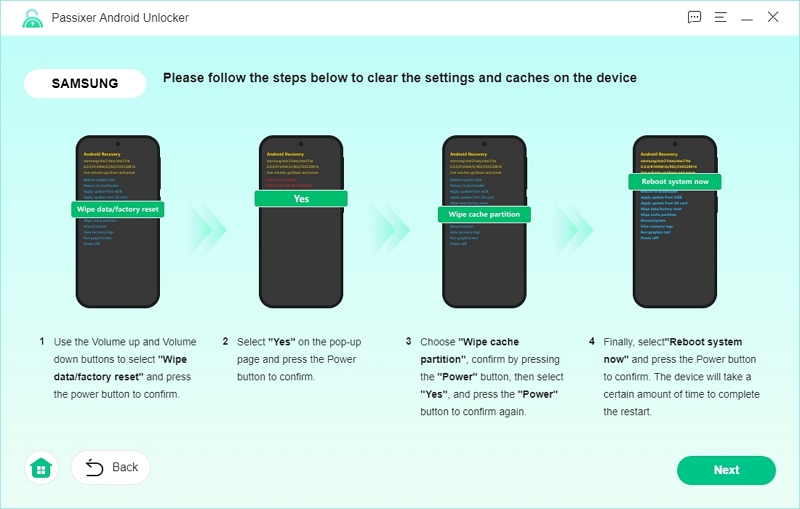
Step 7: Clear all the cache and settings on your Android Phone.
Step 8: Click the “Confirm” button.
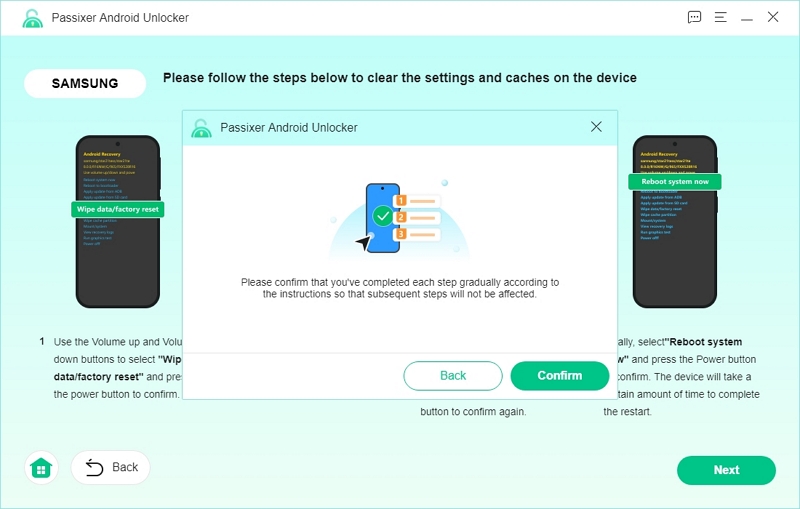
Passixer will bypassing the password from Android.
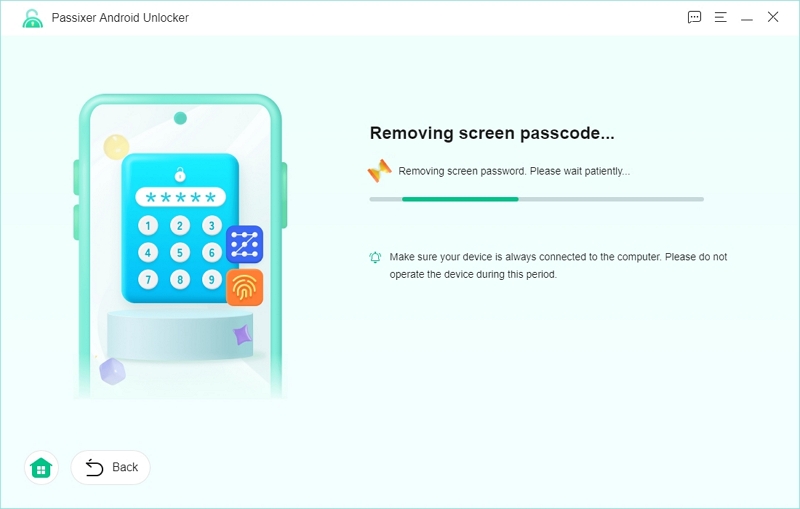
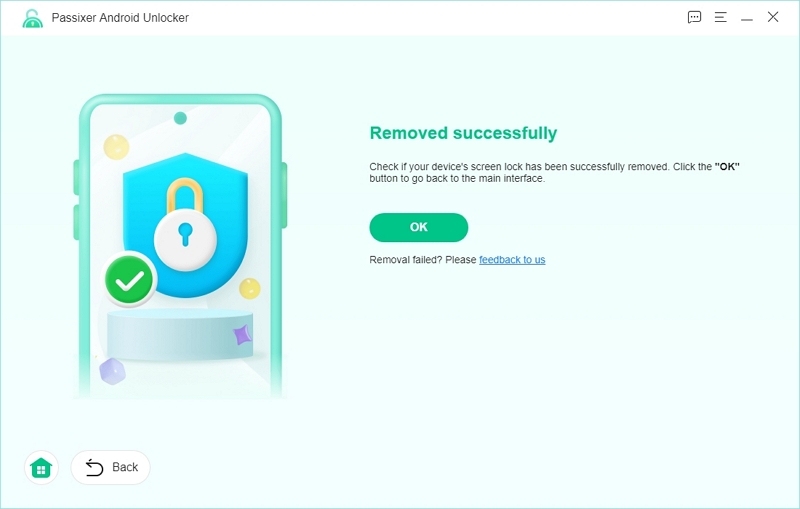
Step 9: After the process is finished, you will receive a notification indicating that the Screen lock has been removed successfully. At this moment, your Android phone is unlocked, allowing you to use it freely without limits.
Method 2: Erase device remotely via Google Find My Device
If you can’t recall your Android phone’s password, PIN, or pattern, and the device is linked to your Google account, you can wipe its data remotely via Google’s Find My Device. This approach necessitates the device being connected to the internet.
Step 1: Launch a web browser on a computer or another device and navigate to Google Find My Device.
Step 2: Sign in using the Google account linked to the locked Android device.
Step 3: After logging in, you will view a list of devices linked to your Google account. Select the locked device from the options.
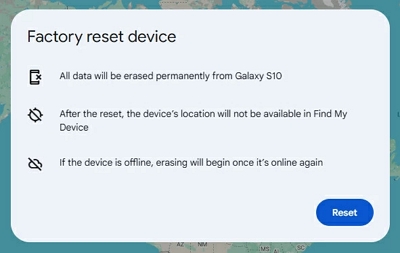
Step 4: From the menu that pops up, select the “Factory reset device” choice.
Step 5: You will need to verify your action. Press “Reset” > “Erase” to start the procedure. This will erase all information from the device, reverting it to its original factory settings.
Method 3: Using ADB Commands (For Advanced Users)
If USB debugging was activated on your Android device before it was locked, you can execute a factory reset utilizing Android Debug Bridge (ADB) commands. This approach necessitates a computer that has ADB set up and a USB link to your device.
Step 1: Obtain and set up the Termux application. Launch Termux and enter the command below to install the required Android tools: pkg install android-tools
Step 2: Access Settings > Developer options on your Android device. Activate USB debugging and Wireless debugging.
Step 3: In the Wireless debugging area, select Pair device using the pairing code. An IP address, along with a port number, will be shown. Take note of the 5-digit port number located at the end of this address.
Step 4: On your device, in Termux, enter this command to connect with your Android device: adb pair localhost:PORT
(Insert the 5-digit number you recorded previously in place of PORT.)
Step 5: You will be asked to input a passcode shown on the pairing screen of your Android device. Input the passcode in Termux. Once pairing is successful, a message should appear to confirm the connection.
Step 6: Exit the Device pairing screen on your Android device. Go back to the Wireless debugging settings and take note of the IP address and port once more.
Note: The port number in this case may be different from the one utilized during the pairing process, so make sure to take note of the accurate one.
Step 7: Return to Termux and input the command below to link to your device: adb connect localhost:PORT#
(Use the 5-digit port number mentioned in the earlier step in place of PORT#.)
Step 8: After connecting the device, you may reset it by executing this command: adb shell am broadcast -a android.intent.action.MASTER_CLEAR
This command will commence a factory reset on your Android device, erasing all data and configurations.
Part 5. How to Factory Reset Android Using Recovery Mode
If your Android device fails to start or you can’t remember your password, executing a factory reset via Recovery Mode can assist. This technique enables you to delete all information and revert your phone to its original settings.
Note: Various Android manufacturers employ slightly distinct button combinations to enter Recovery Mode.
Samsung
Step 1: Turn off your device entirely.
Step 2: Press and hold the Power and Volume Up buttons at the same time.
Step 3: Let go of the buttons once the Samsung logo shows up, and the Android Recovery screen will appear.
Step 4: Utilize the Volume buttons to scroll through the menu.
Google Pixel
Step 1: Power down your phone. Press and continue to hold the Power and Volume Down buttons until the Fastboot Mode screen shows up.
Step 2: Utilize the Volume buttons to choose Recovery Mode, then hit the Power button to confirm.
Step 3: A robot with an exclamation mark may show up on Android. If that’s the case, press and hold the Power button, then tap Volume Up once and release both buttons.
Motorola
Step 1: Turn off your device. Press and hold the Power and Volume Down buttons simultaneously until the Fastboot Mode shows up.
Step 2: Utilize the Volume buttons to move to Recovery Mode and press Power to confirm your choice.
Step 3: If an Android logo shows up, press and hold the Power button, then tap Volume Up once to enter Recovery Mode.
Huawei
Step 1: Shut down the device. Press and hold the Power and Volume Up buttons until the Huawei logo shows up.
Step 2: Releasing the buttons will take you to EMUI Recovery Mode.
Performing the Factory Reset
After you’ve entered Recovery Mode successfully, proceed with these steps to reset your device –
Step 1: Utilize the Volume buttons to scroll to Wipe data/factory reset.
Step 2: Hit the Power button to choose it. Validate the action by choosing Yes.
Step 3: Allow the procedure to finish. Choose Reboot system now to restart your device.

Part 6. What to Do After Factory Reset?
Once you have conducted a factory reset on your Android device, it is crucial to follow certain procedures to guarantee your device operates effectively and safely.
Restore your data
If you had previously activated Google Backup, your apps, contacts, and settings can be automatically recovered during the setup of the device. Alternatively, you can transfer data manually from backups that you have made.
Sign in to your Google account.
This stage is essential to avoid Factory Reset Protection (FRP) problems. It may prevent you from accessing your device if the system fails to recognize your Google credentials.
Check for system updates
Go to your device’s settings and check for software updates to make sure you’re using the most recent Android version. Updating your system ensures you have access to the newest features and security improvements.
FAQ: Common Questions About Factory Reset
Does a factory reset delete SIM card data?
No, executing a factory reset will not erase any data saved on your SIM card. A factory reset returns your device to its initial system condition by deleting all data, settings, and apps saved on the device. However, it does not impact information stored on the SIM card.
Can data be recovered after a factory reset?
Retrieving data post-factory reset is typically difficult, particularly in the absence of an earlier backup. Nonetheless, in certain instances, specialized data recovery software might succeed in recovering specific types of data, like images, even without a backup. It’s crucial to recognize that the effectiveness of these recovery attempts is not assured and may differ based on the device and situation.
Will it void my warranty? (Usually not, but check with the manufacturer)
Usually, executing a factory reset does not invalidate your device’s warranty. In reality, numerous manufacturers view it as a typical troubleshooting procedure and might even suggest it for addressing specific problems. It’s crucial to remember that although a factory reset brings your device back to its original software condition, it does not impact the hardware warranty.
Conclusion
A factory reset can efficiently address performance problems, eliminate malware, and set up your Android device for a new user. Nevertheless, utilizing a tool such as Passixer Android Unlocker provides an easy, dependable way to get past the lock screen and restore your device without losing any information.