Updated on 2025-03-21
5min read
Factory Reset Protection (FRP) is a crucial security feature on Android devices, preventing unauthorized access after a reset. While this protection enhances security, it can be a major hurdle if you forget your Google credentials.
In this guide, we’ll explore five proven methods to bypass the FRP lock, whether you have a PC or not. Whether you’re looking for a quick, hassle-free solution like Passixer Android Unlocker or a free manual workaround, we’ve got you covered.
Part 1. FRP Lock Explained: Everything You Need to Know
FRP Lock is a built-in security feature on Android devices that prevents unauthorized access after a factory reset. If a device is reset without removing the linked Google account, FRP requires the previous Google credentials to proceed. This helps deter theft but can also lock out legitimate users who forget their account details.
Can Google FRP Be Removed?
Yes, FRP can be bypassed using various methods. Some are free but complex, requiring technical steps like APK installations or recovery mode tweaks. Others, like professional unlocking tools, offer a faster, hassle-free solution for a fee.
How Much Does It Cost to Remove an FRP Lock?
The cost depends on the method you choose. Free options exist, but they require patience and technical know-how. Paid software solutions range from $24.99 to $49.99, providing a quick and reliable fix.
FRP Removal Methods: Comparison Table
| Method | Requires PC | Difficulty | Time Cost | Price | Best For |
|---|---|---|---|---|---|
| Passixer Android Unlocker | Yes | Easy | 2-5 mins | $24.99(1 month)~$49.99(lifetime) | Quick, reliable bypass for all Android OS |
| FRP Bypass APK | Yes | Moderate | 10-20 mins | Free | Users comfortable with manual APK installation |
| Google Credentials Reset | No | Easy | 5-10 mins | Free | If you remember the original Google account |
| Google Keyboard Method | No | Moderate | 10-15 mins | Free | Devices with Gboard installed |
| Talkback Mode (Samsung Only) | No | Hard | 15-20 mins | Free | Samsung user with accessibility options enabled |
Part 2. Bypassing FRP on Android (Using PC)
Bypassing FRP using a PC is one of the most effective and reliable ways to regain access to your locked Android device. With the right tools, you can remove the FRP lock quickly, even if you don’t remember the Google account credentials.
Method 1. One-Click FRP Bypass with Passixer Android Unlocker
- Difficulty: Easy
- Time Cost: 2-5 mins
- Price: $24.99–$49.99
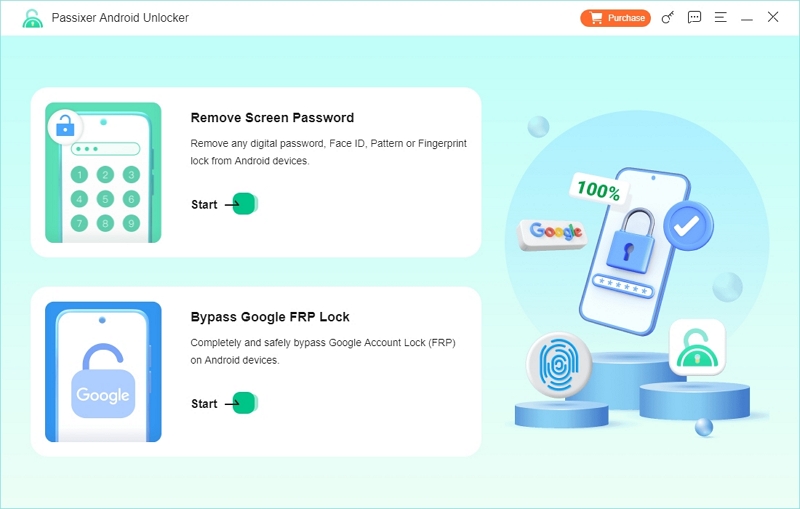
Passixer Android Unlocker is one of the top tools for removing FRP locks and unlocking Android devices. It allows you to bypass the FRP lock without needing the Google account password or remembering the screen lock credentials. Its high success rate makes it a standout solution in the industry.
Key Features
- You don’t need to root your device, and it works with Android OS 15.
- Unlock your device in just 2-5 minutes, even if you’re not a tech expert.
- Remove all types of Android screen locks, including password, pattern, PIN, fingerprint, and face lock.
- Passixer ensures a high success rate and can unlock devices like older Samsung models without losing your data.
Step 1: Download and install the full version of Passixer Android Unlocker on your PC.
Step 2: Open the software and select the Bypass Google FRP Lock option on the main interface.
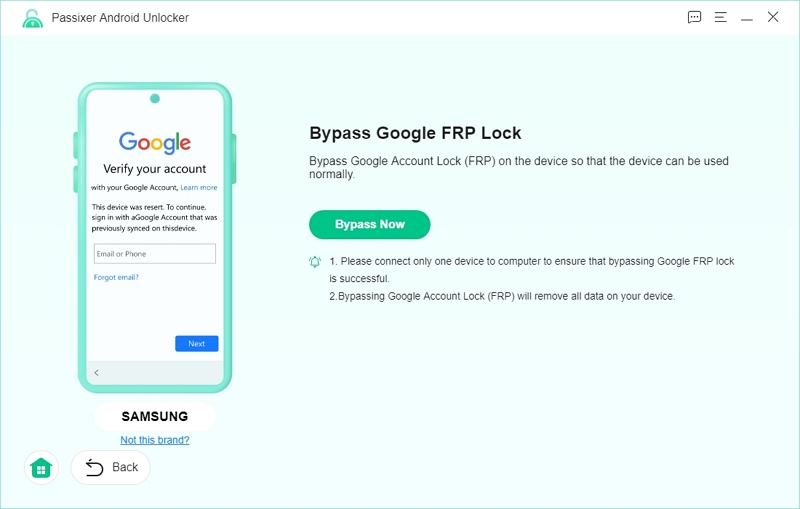
Step 3: Choose your device model from the list of available options to proceed.

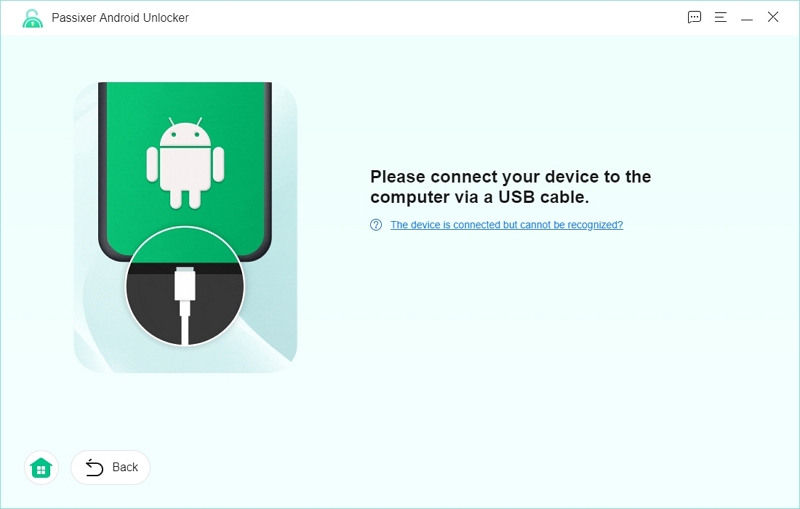
Step 4: Connect your Android phone to the computer using a certified USB cable. Wait for the software to automatically detect your device, or manually select the make and model if needed.
Step 5: Click Bypass Now to begin disabling the Google FRP lock.
Step 6: Follow the on-screen prompts to enable USB debugging on your device. Ensure your Android phone is on the required screen to continue.
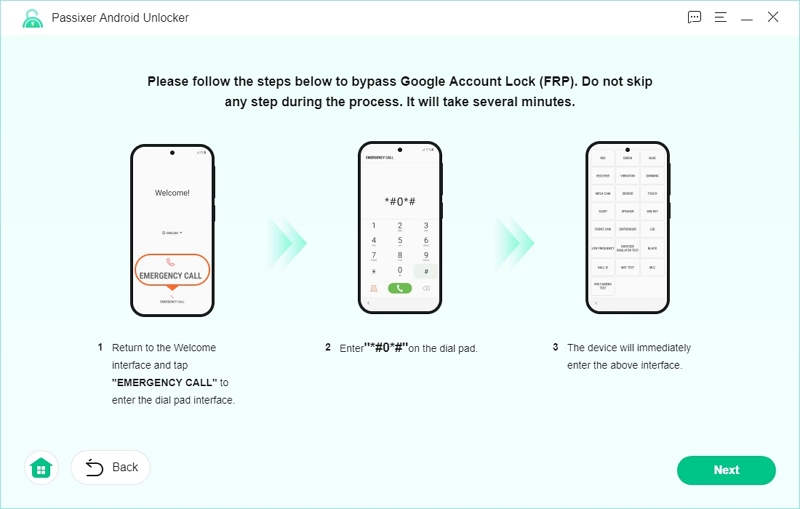
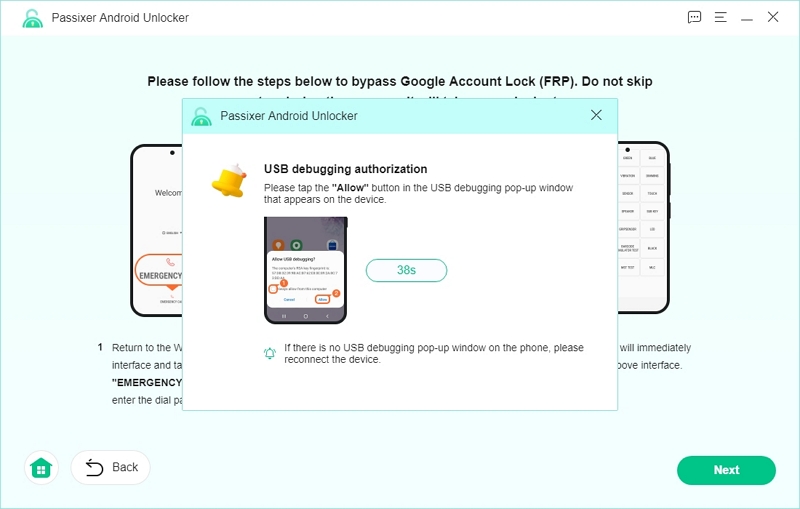
Step 7: On your phone, tap Allow to grant USB debugging access, then choose the correct operating system version installed on your device.
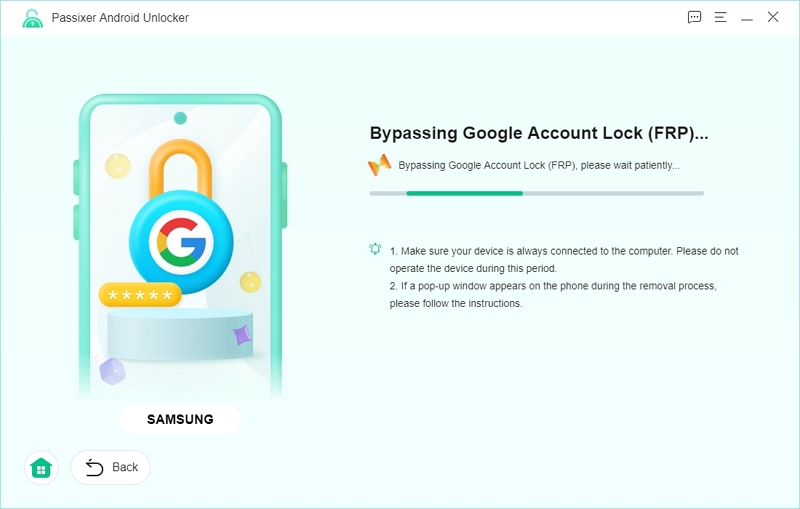
Step 8: Hit Start Bypassing to initiate the FRP bypass process. Note that all data and settings on your device will be wiped during this step.
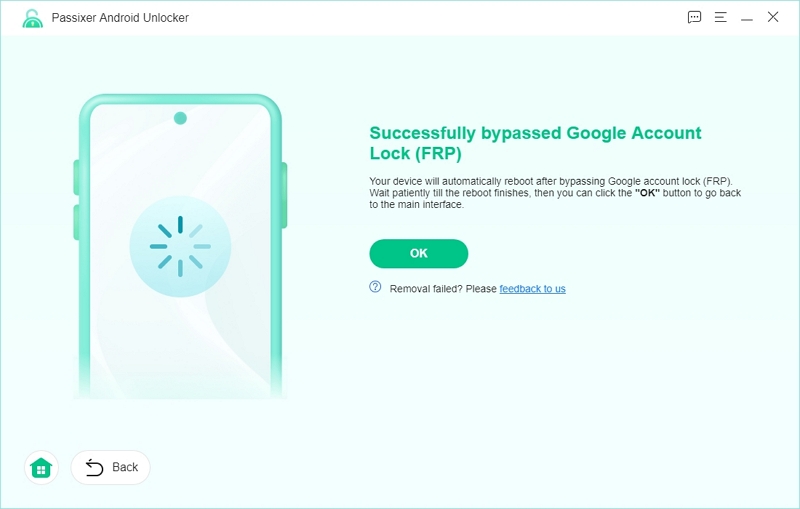
Step 9: Once you see the “FRP removal successful” notification, your device is unlocked and free from the Google FRP lock. You can now access it without any restrictions.
Method 2. FRP Bypass APK (Manual Installation)
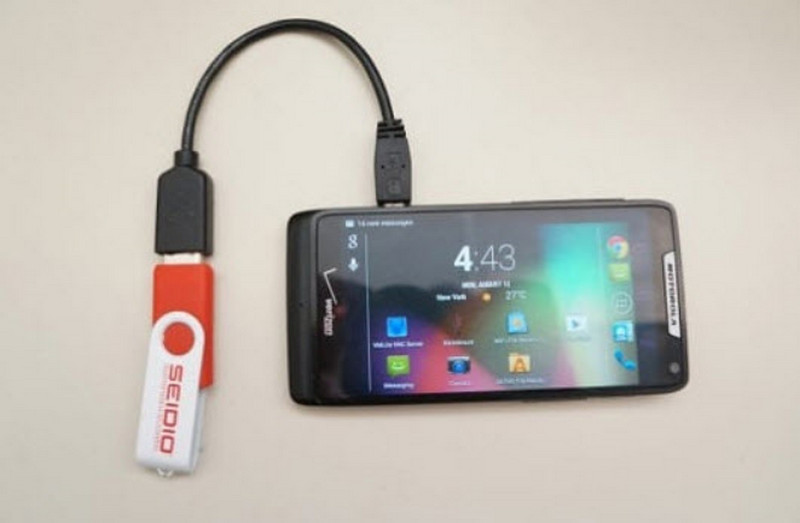
For manual installation, you’ll need a PC, an OTG cable, and a USB drive to install the bypass tool. Although it is free, it can get a bit complex, especially if you don’t have experience with tech:
- Difficulty: Moderate
- Time Cost: 10–20 mins
- Price: Free
Here is a step-by-step guide to bypass the FRP lock using this method:
Step 1: Download the FRP Bypass APK from a trusted site (e.g., lavileztechservice.com) and transfer it to a USB drive or OTG cable.
Step 2: Connect the USB drive to your locked phone using an OTG cable. If a pop-up doesn’t appear, navigate to File Manager > USB Storage to find and open the APK.
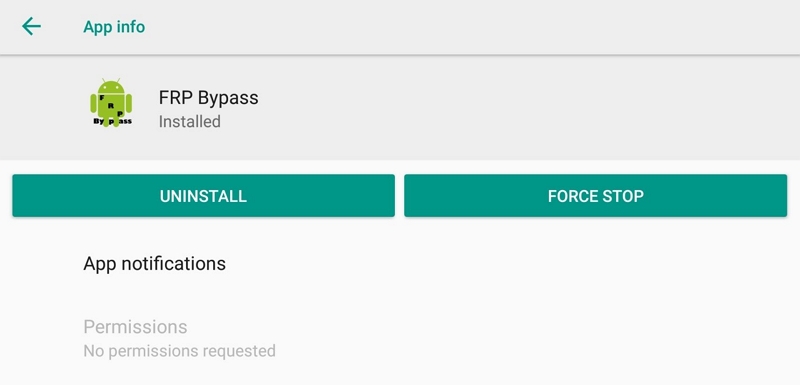
Step 3: Enable “Install from Unknown Sources” on your phone, then install the FRP Bypass APK and open the app.
Step 4: Tap the menu icon (three dots) and select “Browser Sign-in” to log into a Google account.
Step 5: Restart your phone. During setup, the phone will recognize the new Google account, and you’ll be able to access it normally.
Notes:
If this method doesn’t work, you should try using an alternate APK or resetting Google Play Services. Some devices may require additional steps, such as disabling Google Account Manager before proceeding.
For Samsung devices, consider using Technocare APK or visiting resources like Quick ShortcutMaker.
Part 3. Bypassing FRP on Android (Without PC)
Now, let’s take a look at some of the potential solutions if you don’t have a PC to work with:
Method 1. Remove Google Lock for Free with Google Credentials
- Difficulty: Easy
- Time Cost: 5–10 mins
- Price: Free
Below are the steps you should follow to regain credentials to your Google account if you don’t remember the password:
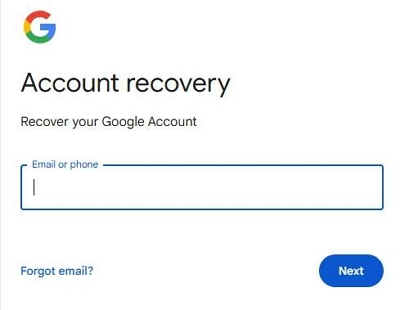
Step 1. Launch your browser and navigate to the Google account recovery page.
Step 2. Enter your Gmail address and click “Next” to proceed.
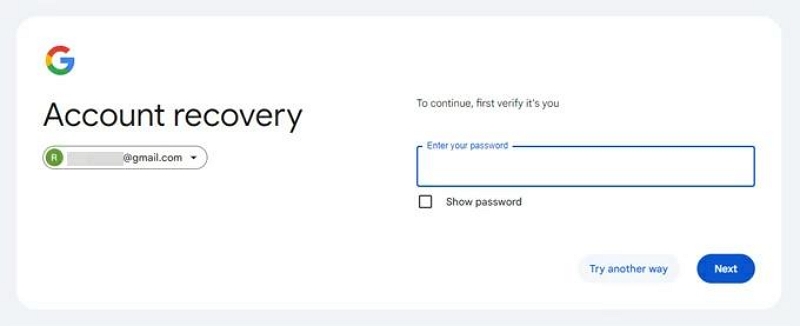
Step 3. Click on “Try another way” to begin the recovery process. You’ll receive a link in your Gmail within 6 hours to verify your identity.
Step 4. Open the email and follow the prompts to reset your password.
Step 5. Set your new password, then confirm it by clicking “Save.”
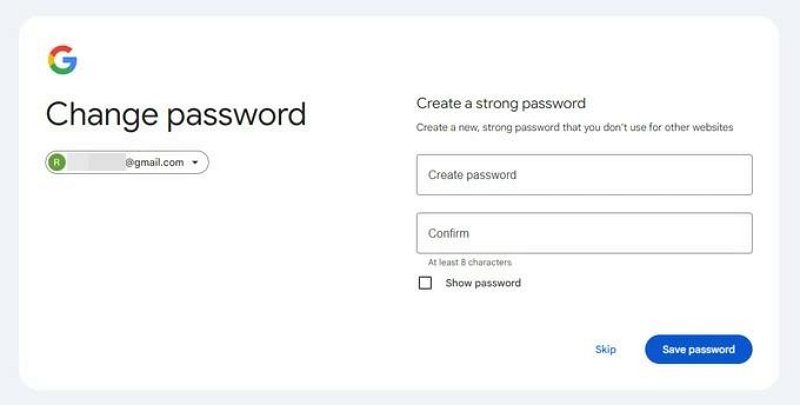
Step 6. Use your updated password to log in and regain full access to your account.
Method 2. Bypass FRP with Installed Google Keyboard
- Difficulty: Moderate
- Time Cost: 10–15 mins
- Price: Free
Bypass FRP (Factory Reset Protection) using Google Keyboard with these steps:
Step 1. After performing a factory reset on your phone, begin the setup process by selecting your preferred language and connecting to Wi-Fi.
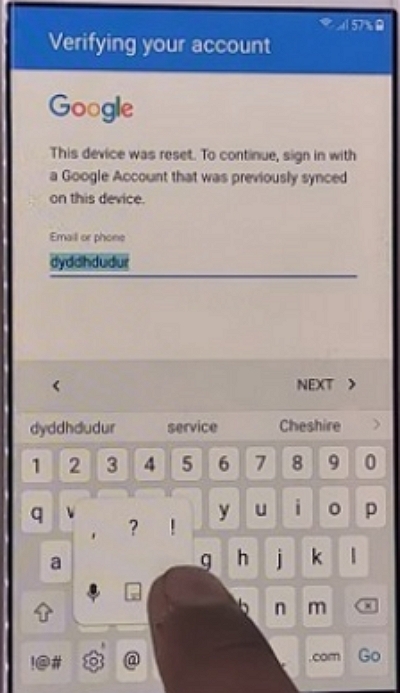
Step 2. You’ll be prompted to activate the device with your Gmail account. Tap the text field to bring up the keyboard. Once the keyboard appears, press and hold the “@” button to open Settings.

Step 2. Tap the three dots in the upper-right corner and select Help & Feedback from the menu to access the Keyboard settings.
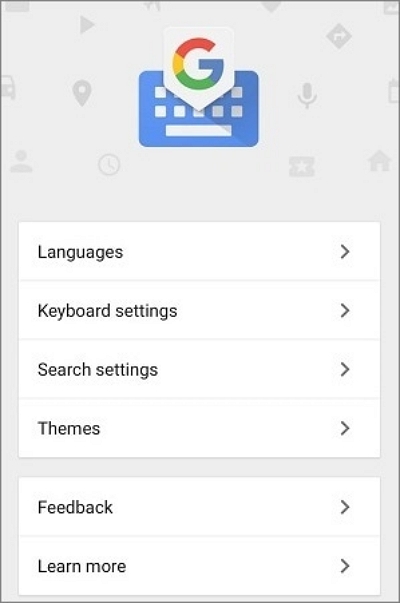
Step 3. In the keyboard settings, tap the three dots in the top-right corner and choose Help & Feedback. To select text, press and hold the screen. Then, tap the Websearch icon in the upper-right corner.
Step 4. In the search box, type “Settings” to open the Settings menu. Once inside, scroll down and tap About Phone, then select Software Information.
Step 5. Find Build Number and tap it 7 times to enable Developer Mode.
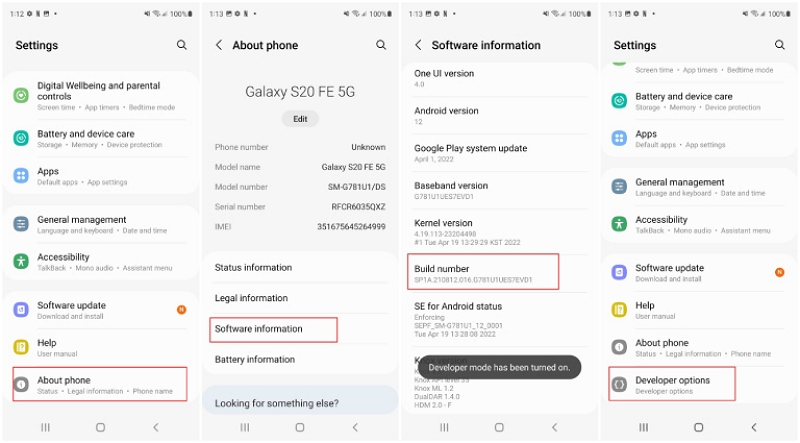
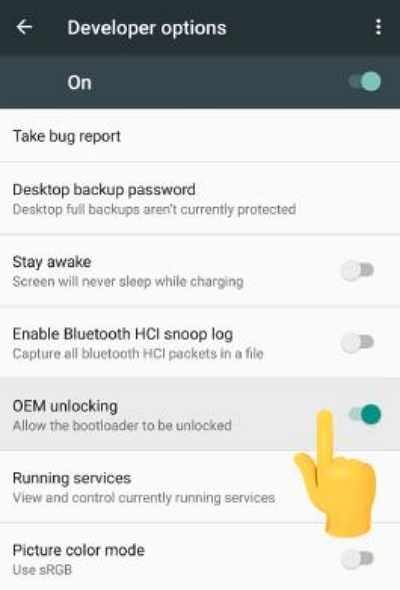
Step 6. Go back to the previous menu and open Developer Options. Toggle the switch next to OEM Unlocking to enable it.
Step 7. Now you can continue setting up your phone without needing to enter your Google Gmail account credentials.
Method 3. Enable Talkback Mode (Samsung Only)
- Difficulty: Hard
- Time Cost: 15–20 mins
- Price: Free
You can bypass the Google account verification on a Samsung device using an app called Google TalkBack. This process is intricate, so it’s important to follow the steps carefully. Although it may seem complex, it’s a useful method for bypassing the Google account on Samsung phones running Android versions 5.0 to 7.0.
Step 1. Begin by resetting your Samsung phone and waiting until the “Welcome” screen appears. Select your preferred language and tap Start.
Step 2. Connect to Wi-Fi and input any random information in the Google account email field. Long press the text to select it, then open the Keyboard Settings.
Step 3. Open the About Samsung Keyboard section, find the Open Source License, and long press the agreement. Tap the three dots, then select Web Search. Your request will be blocked.
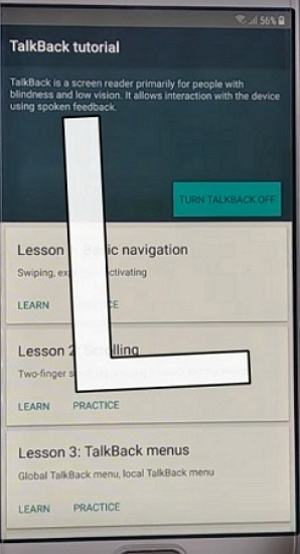
Step 4. Return to the Wi-Fi settings and press the Home button multiple times to launch Google TalkBack. In the tutorial, spell the letter “L” on the screen.
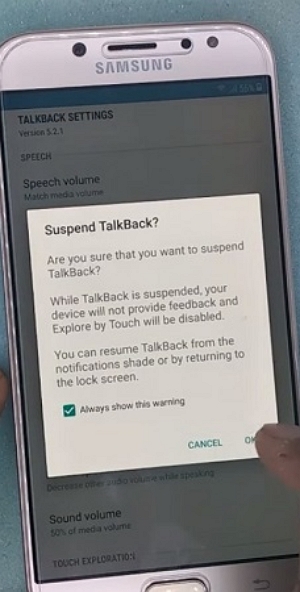
Step 5. Access the Global Context Menu and keep tapping TalkBack Settings until you can navigate through them.
Step 6. In TalkBack Settings, press both volume buttons simultaneously to pause TalkBack. Confirm with OK and return to the settings.
Step 7. Scroll to the bottom of the TalkBack Settings page, tap Help & Feedback, and select Get Started with Voice Access.

Step 8. Watch the YouTube video for Voice Access, then click the link above to open the YouTube app.
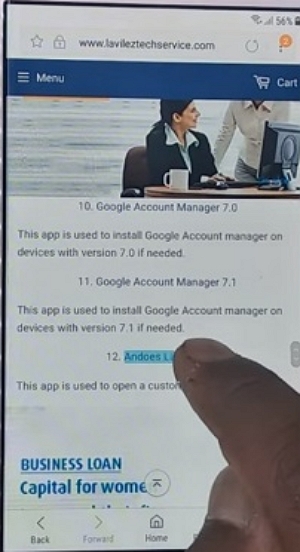
Step 9. In YouTube, tap on your profile icon and choose Terms & Privacy Policy to view it in your browser. Tap Cancel in the dialog box to go to the Terms of Service page. Search for “Lavileztechservice” on Google and download Andoes Launcher (or quickshortcutmaker-2-4-0.apk if unavailable).
Step 10. Locate Andoes Launcher in your Download History, then tap to open it.
Step 11. When the dialog box appears, tap Settings and go to Unknown Sources to disable it. Confirm with OK to install the launcher.
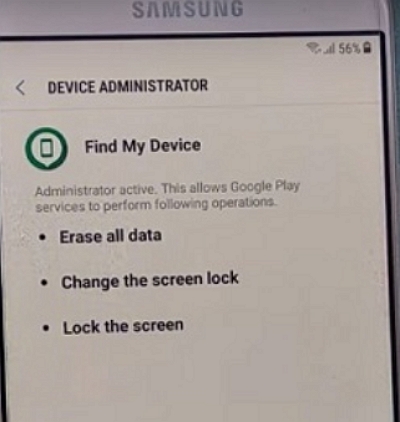
Step 12. After installation, navigate to Device Settings > Lock Screen & Security > Other Security Settings. Uncheck Find My Device under Device Administrators.
Step 13. In the Settings menu, enable the visibility of system apps under Apps. Disable Google Account Manager and Google Play Services.
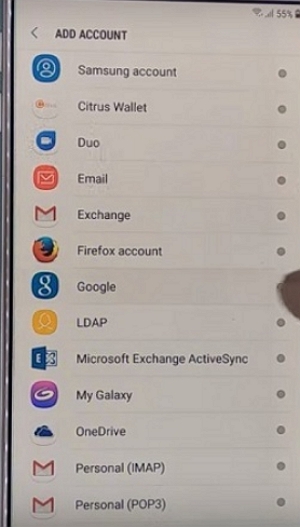
Install the Technocare app from Download History. After installation, go to Settings > Clouds and Accounts > Accounts, then tap Add Account and choose Google.
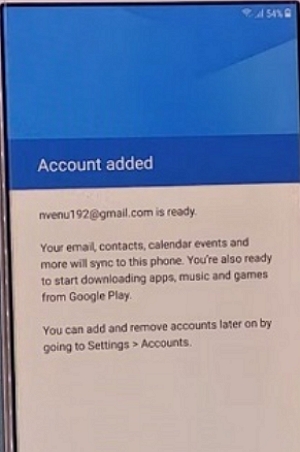
Step 14. If you see the “Couldn’t Sign In” message, tap Next and retry until successful. Enter your new Gmail account, and the device will verify it.
Step 15. Go to Settings > Other Security Settings > Device Administrators and enable Android Device Manager. Enable Google Play Services under Apps, then restart the device.
Step 16. After the restart, tap Start on the Welcome screen and agree to all terms.
Step 17. During the setup, choose Don’t Restore to bypass security checks. Go to Settings > About Phone > Software Information, tap the Build Number seven times to activate Developer Mode.
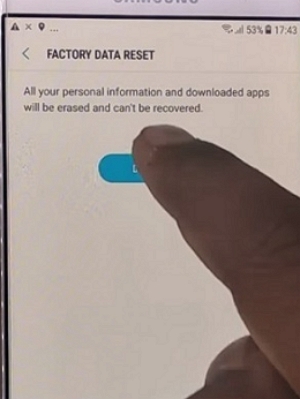
Step 18. Enable USB Debugging and OEM Unlock in Developer Options. Then, from About Phone, select Reset > Factory Data Reset and confirm by tapping Delete All to initiate the reset.
Step 19. Once the reset is complete, tap Start and complete the setup. You will see that the Google account is verified, and the device is now ready to use.
Part 4. How to Managing Google FRP: Enable, Disable
Managing Google FRP (Factory Reset Protection) is an essential part of ensuring the security of your device. FRP prevents unauthorized access to your device after a factory reset, requiring users to verify their Google account credentials. Here’s how you can manage it effectively by enabling, disabling FRP.
How to Enable Google FRP
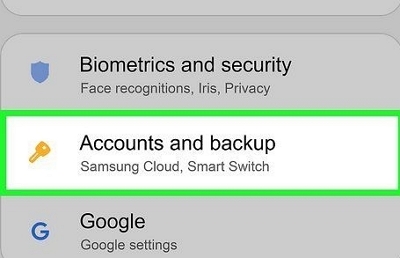
Step 1. Open the Settings app on your Android device. Tap on Accounts or Accounts and Backup.
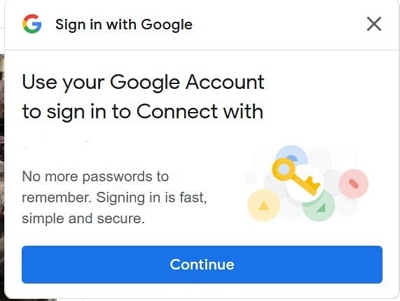
Step 2. If you haven’t added a Google account yet, add one. This will enable FRP automatically.
Step 3. Once your Google account is linked to the device, FRP will be activated. To verify, perform a factory reset and you will be asked to sign in with the Google account linked to the device.
How to Disable Google FRP
Disabling FRP can be useful if you plan to sell or give away your device. Here’s how to disable it:
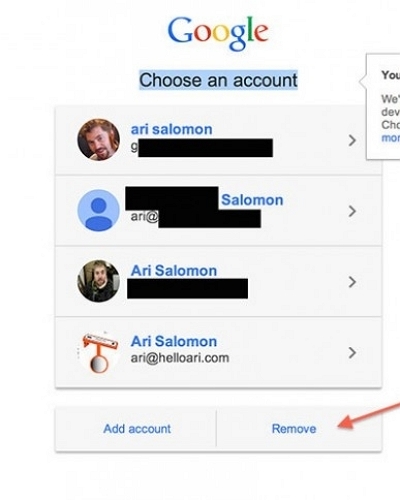
Step 1. The easiest way to disable FRP is to remove your Google account from the device.
- Go to Settings > Accounts.
- Tap on your Google Account.
- Select Remove Account.
Step 2. Once you remove your Google account, you can proceed with a factory reset without triggering FRP.
- Go to Settings > System > Reset.
- Tap on Factory Data Reset and confirm.
Note that OEM Unlocking should also be disabled if you don’t want the device to ask for verification after a reset. You can find this option in Developer Options under Settings.
Conclusion
Through the article above, you’ve understood the different ways to bypass FRP protection on your devices. As you can clearly see, it is super complicated to achieve using free methods if you don’t have the luxury of time or are not well-versed with DIY tech solutions. As a result, Passixer is the best option for you, saving you time and effort.